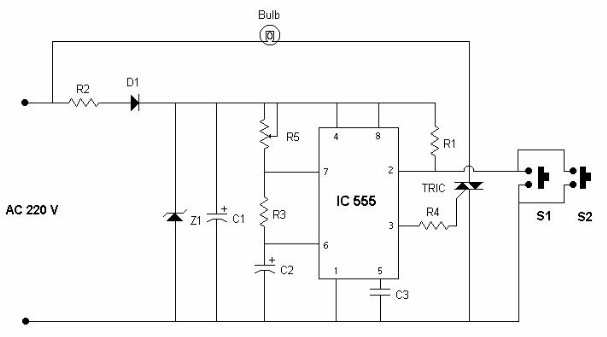
-
Resistors
- R1, R3 ( 10Kilo ohms)
- R2 (10K kilo ohms / 10W)
- R4 (220 ohms)
- R5 (1Mega ohms)
-
Integrated circuit
- IC 555
-
TRIC
- TRIC (BT136)
-
Diode
- D1 (IN 4001
- Z1 ( 12V Zener diode)
-
Capacitor
- C1 (1000 mfd /25V)
- C2 (200 mfd/ 16V
- C3 (0.1 mfd)
-
Miscellaneous
- Push to on switch (S1, S2)
- Bulb (220V/ 60W)
- PCB or Breadboard
- Flexible Wire
- Soldering rod etc..
Good thing about this circuit is that the user needs to push the button only ones : To turn the light on. The light will turn automatically OFF after some time, since the switching OFF mechanism is timer based. Also note that the "push to on" switch is used here, this should be momentarily pushed to turn the light on.
When "push to on" switch is pushed, pin-2 gets a negative pulse, and the timer gets triggered. Due to this C2 connected with pin-6 and pin7 starts charging slowly. After some time, when the voltage across C2 goes above 2/3 Vcc, the timer stops working and the light turns OFF automatically. Duration for which the light will be ON depends upon the R5 value. The Zener diode Z1 and C1 combination is used here to provide constant 12V DC for IC-555. Diode D1 is used so that the capacitor C1(providing power to the IC) gets only positive cycle for charging.

