-
Resistors
- R1 (330 ohms 1/2W)
- R2 (8.2 Kilo ohms 1/2W)
-
Capacitor
- C1 (500mf/ 16V)
- C2 (0.01mf/ 50V)
-
Transistor
- T1 (BC148B)
- T2 (AC128)
-
Diode
- D1 (BY125)
-
Transformer
- TR1 (230V to 6v step down, 200mA )
-
Miscellaneous
- Speaker (8 ohms)
- Neon lamp
- Pushbutton (S1)
- PCB or Breadboard
- Flexible wires
- Soldering rod etc..
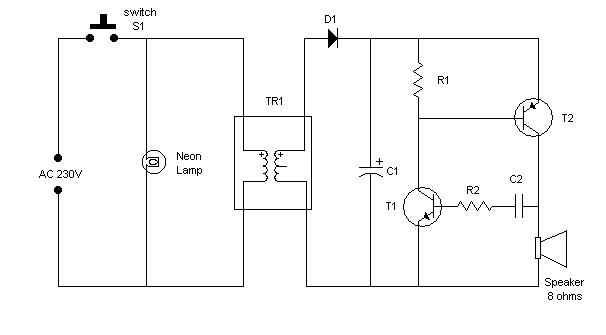
This is a very simple musical electronic bell. This bell not only gets you rid from old irritating noisy bells, but also avoids unwanted disturbances on radio and TV produced by damp waves. These damp waves are generated by electrical devices when they are switched on or off.
In this circuit when the push-button(S1) is pushed, current starts flowing through the transformer. This transformer is a step-down transformer which converts 230V AC to 16V AC. The stepped down voltage is passed through diode D1. Diode D1 behaves as a half wave rectifier and passes only positive voltage. This positive voltage is used to charge capacitor C1. The Charged capacitor C1 acts as a power source for low frequency oscillator. Transistor T1 and T2 are connected in such a way that they constitute a low frequency oscillator of 1 kHz. This oscillating voltage generates oscillating current which flows through the speaker, and generates a sweet tone. The pitch of the generated tone can be changed by using different values of R2 or by using preset of 10K ohms in place of R2.
